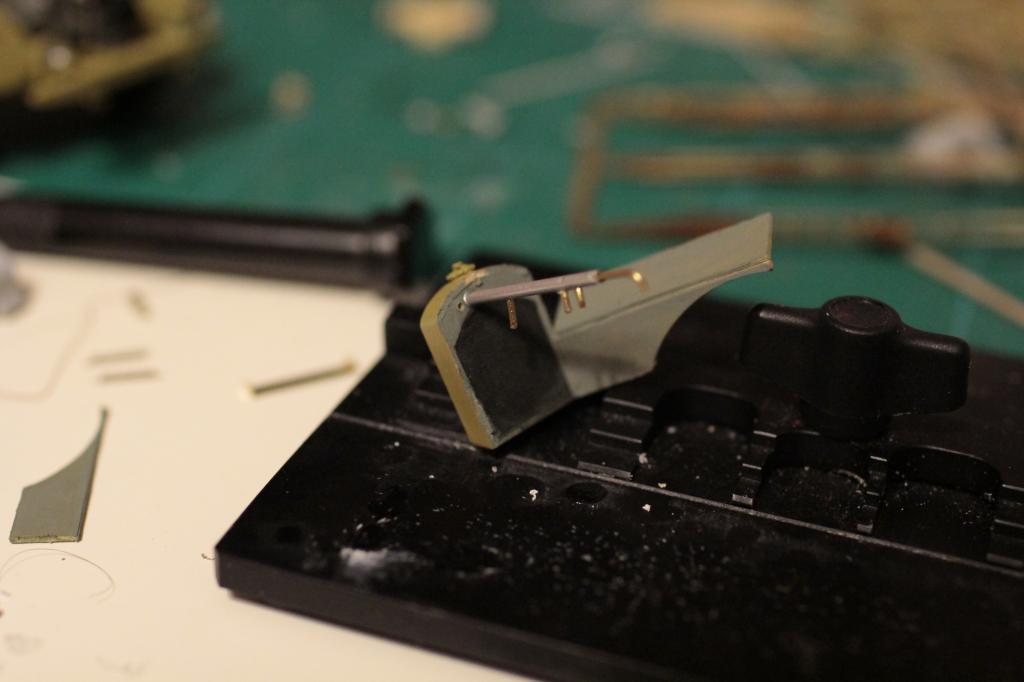
I will start with the Mercedes Benz L4500A, a 4×4 real workhorse of the Wehrmacht. Take into consideration that the above mentioned model was half finished when i decided to superdetail the engine, which was glued in place.. This made everything much more difficult.. So lets get to it! I have added the horn which i have scrathbuilded. I have added to the horn wiring of 0,3mm and i have drilled the holes on the horn´s surface with a 0,2 drill. I used photoetch frets iot make the base of the horn. I added also the fuse box with 3 0,3mm wires and the and the sterring wheel oil recipient with a wire of 0,5mm.The base of it was made with photoetched fret.
Unas fotos de la marcha de los trabajos en el motor de L4500A inacabado . He añadido la bocina, que he colocado un cable de 0,3mm diam y la pieza de plástico con los agujeros hechos con una arida 0,2 mm. La base de la bocina , que no se muestra la he hecho con PE , que se pliega a continuación . Se ha colocado , además, una caja con 3 cables de 0,3 mm y un recipiente con alambres de latón 0,5 mm . La base del recipiente se hizo de la misma manera .
Λίγες φωτογραφίες από την πρόοδο εργασιών στη μηχανή του μισοτελειωμένου L4500A.
Έχω προσθέσει την κόρνα, στην οποία τοποθετήθηκε καλωδίωση 0,3χιλ και στο πλαστικό κομμάτι οι τρύπες έγιναν με αρίδα 0,2 χιλ. Η βάση της κόρνας, η οποία δεν φαίνεται έγινε κόβοντας ένα μήκος από πλαίσιο ΡΕ, το οποίο εν συνεχεία διπλώθηκε. Έχει τοποθετηθεί επιπλέον ένα κυτίο με 3 καλώδια 0,3 χιλ και ένα δοχείο με μπρούτζινα καλώδια 0,5χιλ. Η βάση του δοχείου έγινε με τον ίδιο τρόπο.


Some reference photos.
Κάποιες ενδεικτικές φωτογραφίες του πραγματικού.
Unas fotos de referencia.


I continued with the engine afterwards. 12 little holes (0,3mm) have been opened . On the upper raw i have placed six very thin pieces of white cable while on the down raw i have placed Evergreen pieces of rod of 0,5mm with a height of 1mm each. I placed the alternative fuel line with a wire of 0,3mm while the main fuel lines ( 6 wires of 0,1mm) were glued inside the white cable pieces.
Continué con el motor después. 12 pequeños agujeros ( 0,3 mm ) se han abierto . En la prima superior he colocado seis piezas muy finas de cable blanco, mientras que en el prima de abajo he colocado Evergreen piezas de varilla de 0,5 mm con una altura de 1 mm cada uno. Coloqué la línea de combustible alternativo con un cable de 0,3 mm , mientras que las principales líneas de combustible (6 cables de 0,1mm ) están pegados en el interior de las piezas de cables blancos.
Ανοίχθηκαν 12 τρύπες (0,3 χιλ) και τοποθετήθηκαν 6 μήκη από Έβεργκριν (κάτω σειρά). Στην πάνω σειρά τοποθετήθηκαν 6 μήκη από λεπτό καλώδιο. Κατά μήκος των σειρών περάστηκε σύρμα με διάμετρο 0,3 χιλ. Το πιο λεπτό σύρμα είναι 0,1 χιλ και το οποίο περάστηκε εντός του λευκού κούφιου καλωδίου και εν συνεχεία κολλήθηκε. Μου μένουν άλλα 3 τέτοια. Η τοποθέτηση είναι δύσκολη λόγω του ότι ο κινητήρας είναι κολλημένος στο σασί..


The next photos show the assembly of the fuel lines of the engine.
Las fotos que vienen enseñan las cañerias de petroleo de la maquina.
Οι επόμενες φωτογραφίες δείχνουν τις σωληνώσεις του πετρελαίου με τη μηχανή.
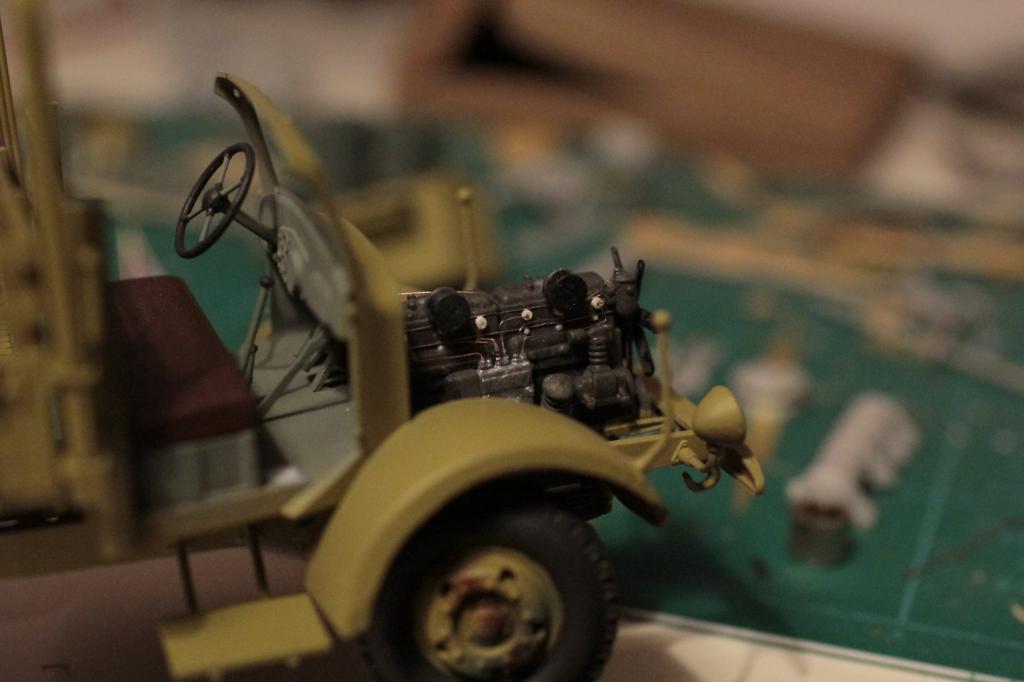

Later i placed a black wire (0,3mm diam)from the filter at the front of the engine and one golden wire (o,5mm diam) from the distributor to the air tank (will show it at the next photos).
Más tarde he puesto un alambre negro ( diámetro 0,3 mm ) desde el filtro en la parte delantera del motor y un alambre de oro ( o, de diámetro 5 mm) desde el distribuidor hasta el tanque de aire (será presentado en las próximas fotos) .
Πρόοδος εργασιών στο φορτηγό. Έχει τοποθετηθεί μία σωλήνωση 0,3 χιλ από τον διανομέα στο φίλτρο και ακόμα μια πάχους 0,5 χιλ (χρυσή) στην οποία έχει τοποθετηθεί στην ένωση ένα κομμένο λευκό καλώδιο.

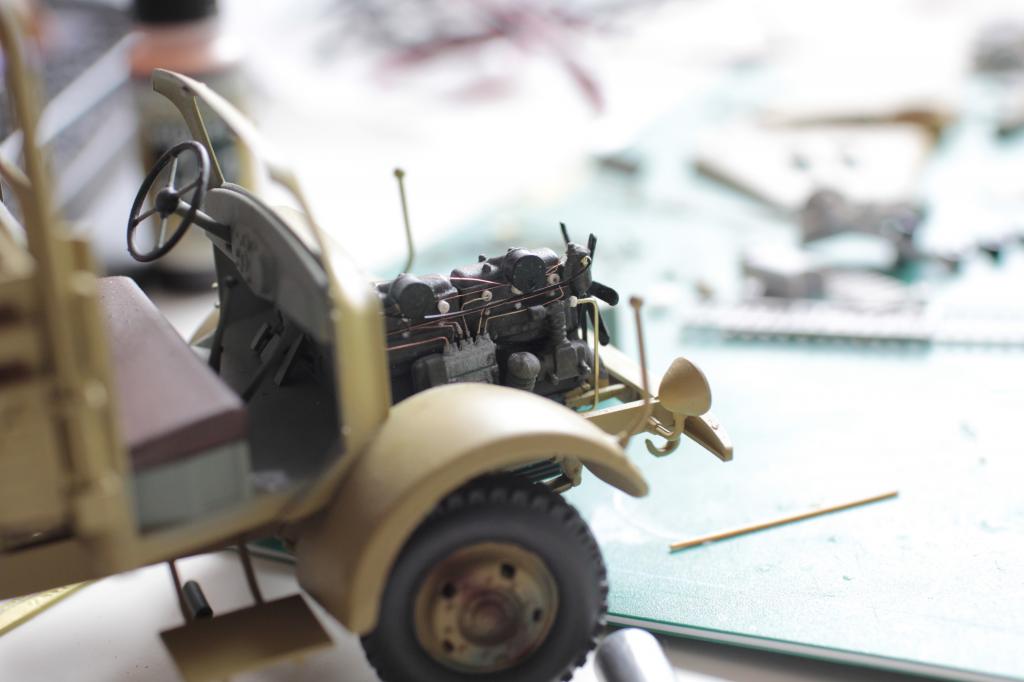
I have constructed from a 1mm diameter tube with an opening of 0,5mm the pressure distributor which consist of two parts. Both are placed on the firewall. The connection between them was achieved with a 0,3mm diameter wire and 0,8mm length. From the left part i placed a golden wire (0,5mm diam) which ends to the characteristic spiral. The tube was intentionally built like this by the Germans for two reasons. First for the cooling of the air that was being transported from the air pump to the air tank and second in case that this rubber tube was broken or torn the driver used the excess of the tube that was rolled in spiral. The base of the distributor was made by plastic sheet (0,1mm thich) and its dimensions were 2,5mm x 2,5mm. I placed on the base 4 bolts from my spare photoetched parts box!
He construido a partir de un tubo de 1 mm de diámetro con una abertura de 0,5 mm el distribuidor de presión que se compone de dos partes. Ambos se colocan en el firewall. La conexión entre ellos se consiguió con un alambre de diámetro 0,3mm y 0,8mm longitud. Desde la parte izquierda puse un alambre de oro ( diámetro 0,5 mm ), que termina a la espiral característica. El tubo fue construido intencionalmente como éste por los alemanes por dos razones. En primer lugar para el enfriamiento del aire que estaba siendo transportado desde la bomba de aire al tanque de aire y segunda en caso de que este tubo de caucho estaba roto o desgarrado el conductor utilizaba el exceso del tubo que se enrolla en espiral. La base del distribuidor fue hecha por lámina de plástico ( grossor 0,1mm ) y sus dimensiones eran 2,5mm x 2,5mm . Me coloqué en la base 4 pernos de mi caja de fotograbados repuesto !
Έχει κατασκευαστεί από κούφιο σωλήνα πάχους 1χιλ και με διάμετρο τρύπας 0,5 χιλ ο διαμοιραστής πίεσης (2 μέρη).Η σύνδεση μεταξύ των έγινε με σύρμα μήκους 0,8 χιλ και διαμέτρου 0,3 χιλ. Από την αριστερή πλευρά τοποθετήθηκε σωλήνωση διαμέτρου 0,5 χιλ στην οποία έγινε και το χαρακτηριστικό σπιράλ! Η βάση του διαμοιραστή είναι από φύλλο πλστικού πάχους ο,1 χιλ και σε διαστάσεις 2,5 χ 2,5 χιλ. Εν συνεχεία τοποθετήθηκαν 4 μπουλόνια (περισσεύματα από ΡΕ).


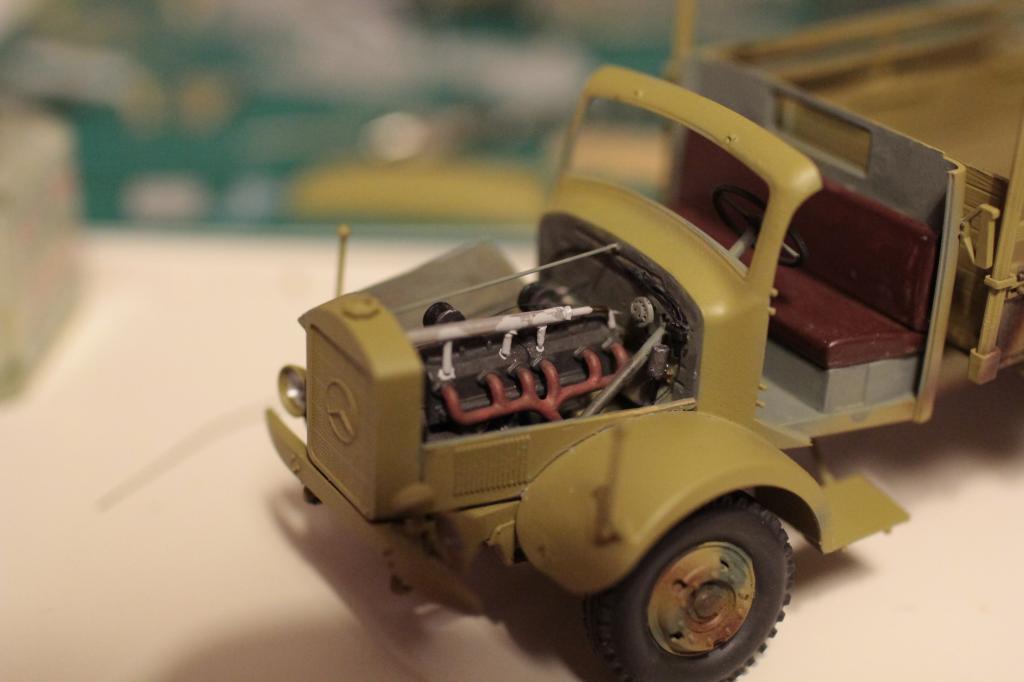
The construction continued with the emplacement of the electrical wires (0,1mm diam) from the fuse box into the firewall within a hole of 0,5mm diam. Beneath the fuse box the electrical wire of the right light (0,1mm diam) was placed.
La construcción continuó con la colocación de los cables eléctricos ( diam 0,1mm ) de la caja de fusibles en el servidor de seguridad dentro de un agujero de diámetro 0,5mm . Debajo de la caja de fusibles se colocó el cable eléctrico de la luz derecha ( diámetro 0,1mm ) .
Η κατασκευή συνεχίστηκε με την τοποθέτηση καλωδίων διαμέτρου 0,1χιλ από το κυτίο ασφαλειών διαμέσου μιας οπής διαμέτρου 0,5χιλ στον πίνακα οργάνων. Στο κάτω μέρος του κυτίου ασφαλειών τοποθετήθηκε το καλώδιο διαμέτρου 0,1 χιλ που δίνει ρεύμα στο δεξί φως. (Μένει να τοποθετηθεί το καλώδιο για το αριστερό και το νότεκ, και οι πιάστρες των καλωδίων, για τις οποίες θα χρησιμοποιηθούν πλαίσια από ΡΕ).

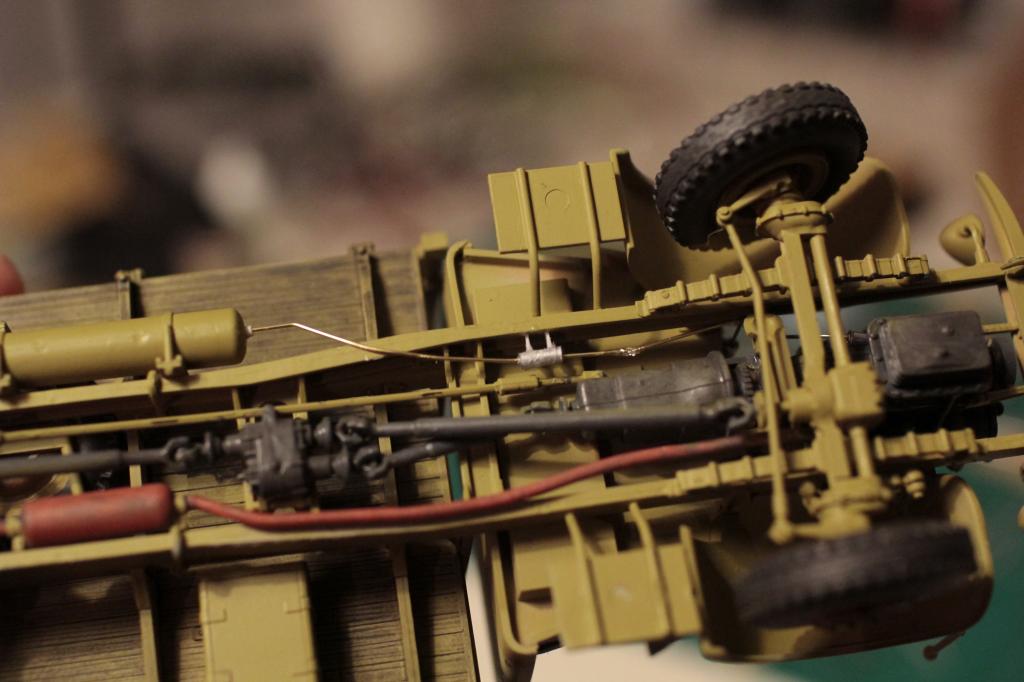
Afterwards i have placed an air tube (0,5mm diam) from the air tank to the distributor of pressure of the chassis ( base is scratch from plastic sheet and the distributor form tube of 1mm diam) . From the chassis distributor i placed another wire (0,5mm diam) that ended to the bottom part of the engine´s air pump.
Después me he puesto un tubo de aire ( diámetro 0,5 mm ) desde el tanque de aire al distribuidor de la presión del chasis ( base es cero de lámina de plástico y el tubo de forma distribuidora de diámetro de 1 mm ) . Desde el distribuidor del chasis coloqué otro alambre ( diámetro 0,5 mm ) que puso fin a la parte inferior de la bomba de aire del motor.
Στην παρακάτω φωτογραφία τοποθετήθηκε σωληνάκι διαμέτρου 0,5 χιλ στη δεξαμενή αέρα το οποίο συνδέθηκε με το διαμοιραστή πίεσης επί του σασί (κατασκευή βάσης από φύλλο πλαστικού και διαμοιραστή από κούφιο σωλήνα διαμέτρου 1χιλ) και εν συνεχεία στο κάτω μέρος του διαμοιραστή πίεσης του διαμερίσματος κινητήρα.
As i have promissed i placed the electrical wire of the left light and also i placed the holders of the wiring to the firewall (i used bracket of photoetch frets).
Como he prometido, puse el cable eléctrico de la luz izquierda y también me puse los titulares de las conexiones al servidor de seguridad ( he usado trastos de soporte de fotograbado ) .
Όπως υποσχέθηκα η φωτογραφία με την καλωδίωση του αριστερού φωτός. Μένει το ψυγείο, το οποίο το δουλεύω τώρα, οι σωληνώσεις αυτού (η μία είναι σταθερή πάνω στον κινητήρα) και το κάλυμμα του κινητήρα, το οποίο θα είναι ανοικτό! οι πιάστρες της καλωδίωσης έγιναν από πλαίσια που συγκρατούν ΡΕ.
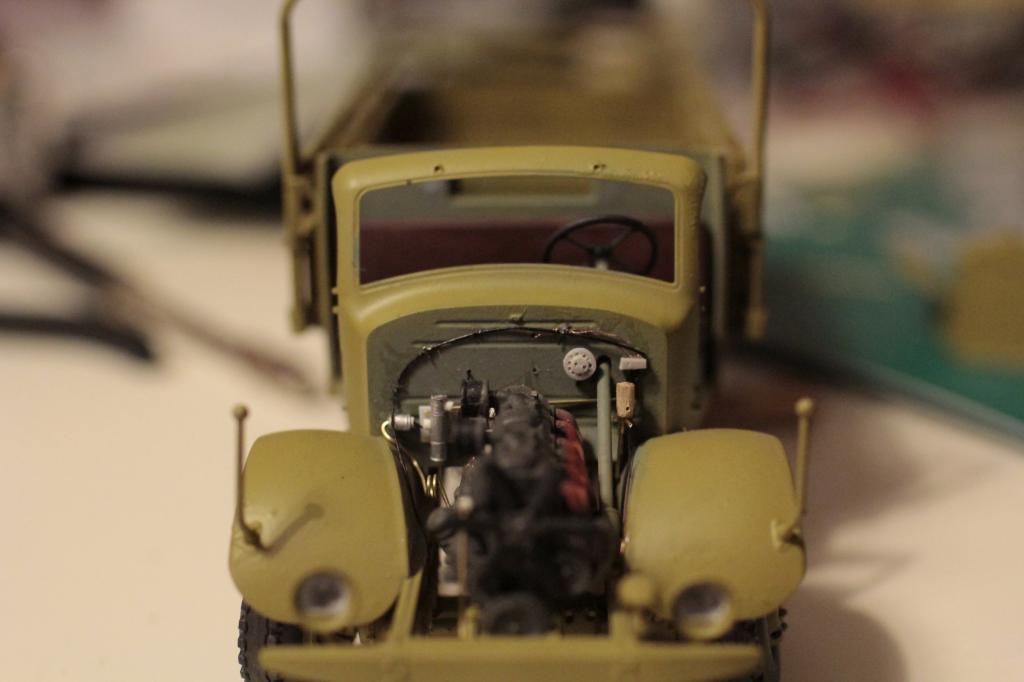
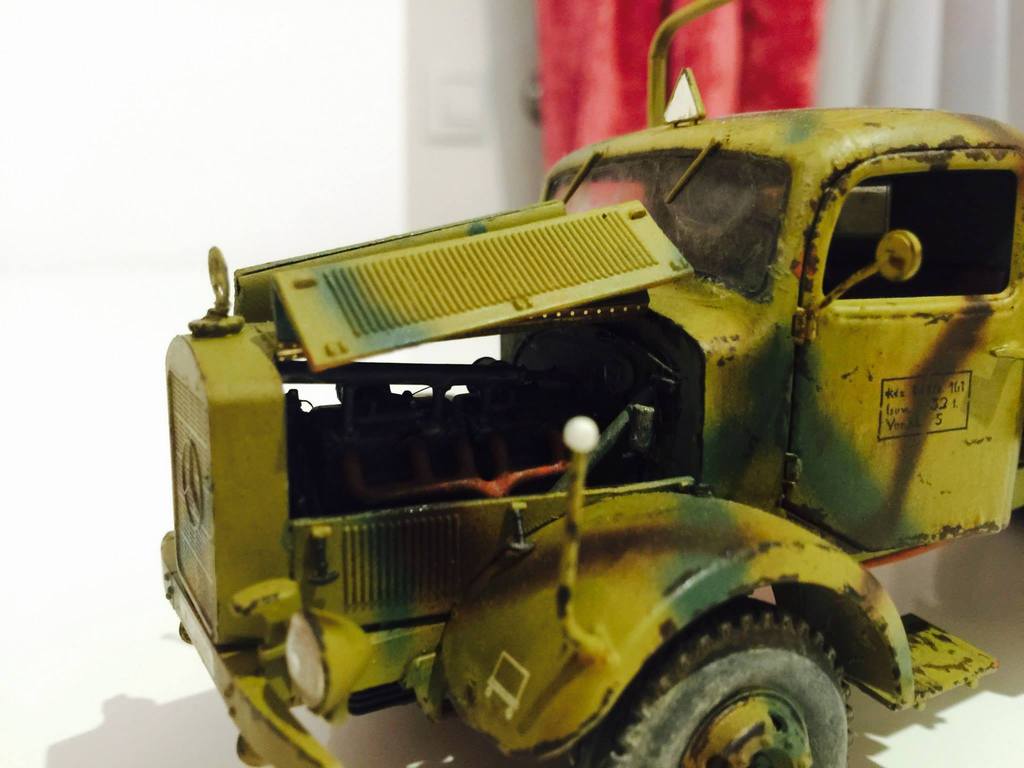
I have placed fine mesh on the radiator from my spare part box and i have scratched the radiator tube. For it i have used a tube (1,2mm diam) and i inserted inside it a wire (1mm diam). For the four junctions of the pipe i used wire (1mm diam). I will use putty for filling the seams.
He puesto malla fina en el radiador desde mi caja de piezas de repuesto y he hecho de scratch el tubo del radiador. Para ello he utilizado un tubo ( diámetro 1,2mm ) y he insertado en su interior un alambre ( diámetro de 1 mm ) . Para las cuatro uniones de la tubería he usado alambre ( diámetro de 1 mm ) . Voy a utilizar masilla para rellenar las costuras.
Κατασκευής συνέχεια! Τοποθέτησα σίτα στο ψυγείο (περίσσευμα από σίτα Βασιλικού Τίγρη της ΤΑΜΙΥΑ) και κατασκευάστηκε η σωλήνωση του ψυγείου. Για την κατασκευή χρησιμοποιήθηκε κούφιος σωλήνας διαμέτρου 1,2 χιλ και σωλήνας διαμέτρου 1 χιλ, ο οποίος περάστηκε μέσα από τον κούφιο. Για τις 4 ενώσεις της σωλήνας του ψυγείου με τον κινητήρα χρησιμοποιήθηκε σωλήνας διαμέτρου 1 χιλ. Στην ένωση των δύο σωλήνων θα τοποθετηθεί στόκος.
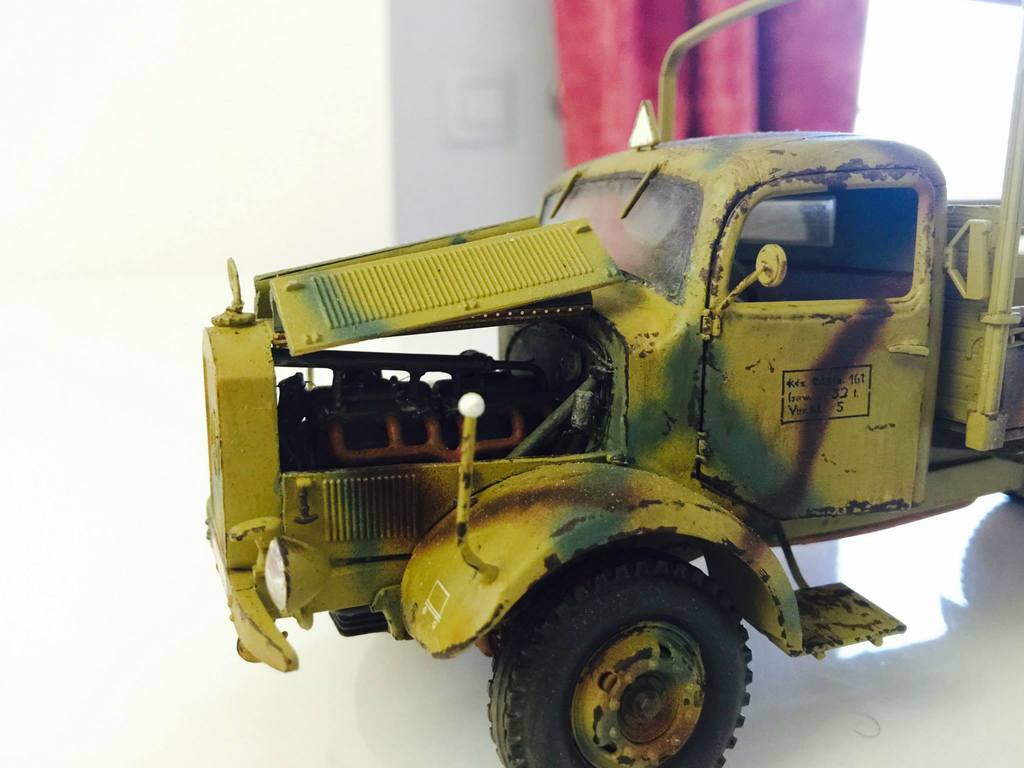
The engine is almost done and i have placed the side panels of it. I have replaced the radiator bar of the kit with a wire (0,5mm diam). Mercedes emblem was trimmed iot be thinner and will be placed later. Putty has been placed on the radiator tubing. The engine compartment has been weathered with AK and Mig products.
El motor está casi hecho y he colocado los paneles laterales de la misma. He reemplazado la barra de soporte del radiador del kit con un alambre ( diámetro 0,5 mm ) . Mercedes emblema se recortó para que sea más delgado y se colocará más tarde. Masilla se ha colocado en el tubo del radiador. El compartimiento del motor se ha envejecido con productos de AK y Mig Productions .
Η μηχανή σχεδόν τελείωσε και ήδη τοποθέτησα τα πλαινά καλύμματα του κινητήρα. Ο δοκός στήριξης του ψυγείου αντικαταστάθηκε με σύρμα 0,5 χιλ. Το σήμα της Μερσεντές έχει λεπτυνθεί με γυαλόχαρτο (είναι αρκετά χοντρό) και θα τοποθετηθεί όταν θα ολοκληρώσω την παραλλαγή του φορτηγού.Σιγά σιγά τελειώνω και με αυτό! Έχει τοποθετηθεί στόκος στη σωλήνωση του ψυγείου και θα επανατοποθετηθεί αύριο μέχρι να επιτύχω το επιθυμητό αποτέλεσμα! Μετά βαφή. Τα τοιχώματα του κινητήρα έχουν παλαιωθεί με ζουμιά ΑΚ και Mig.
I have weathered the cabin´s interior and the windshields are placed. The rooftop has been glued to place and also the triangle and the driver´s mirror. The rubber of the windshield has been painted black-grey. The doors are not glued yet due to the fact that i have to add the camo on the cabin.
He envejecido el interior de la cabina y he colocado los parabrisas. La azotea se ha pegado a otro y también el triángulo y el espejo del conductor. La goma del parabrisas se ha pintado en gris-negro . Las puertas están pegadas sin embargo, debido al hecho de que tengo que añadir el camo en la cabina.
Έγινε πάλαίωση στο εσωτερικό της καμπίνας και τοποθετήθηκαν δύο τζάμια ( αλεξινέμιο και καμπίνας). Κολλήθηκε η οροφή και τοποθετήθηκε το τρίγωνο και ο καθρέπτης οδηγού. Βάφτηκε με μαύρο-γκρι το λάστιχο στεγανοποίησης του αλεξινέμιου. Οι πόρτες δεν έχουν κολληθεί, γιατί πρέπει να βαφεί η καμπίνα. Μετά θα αποφασίσω!
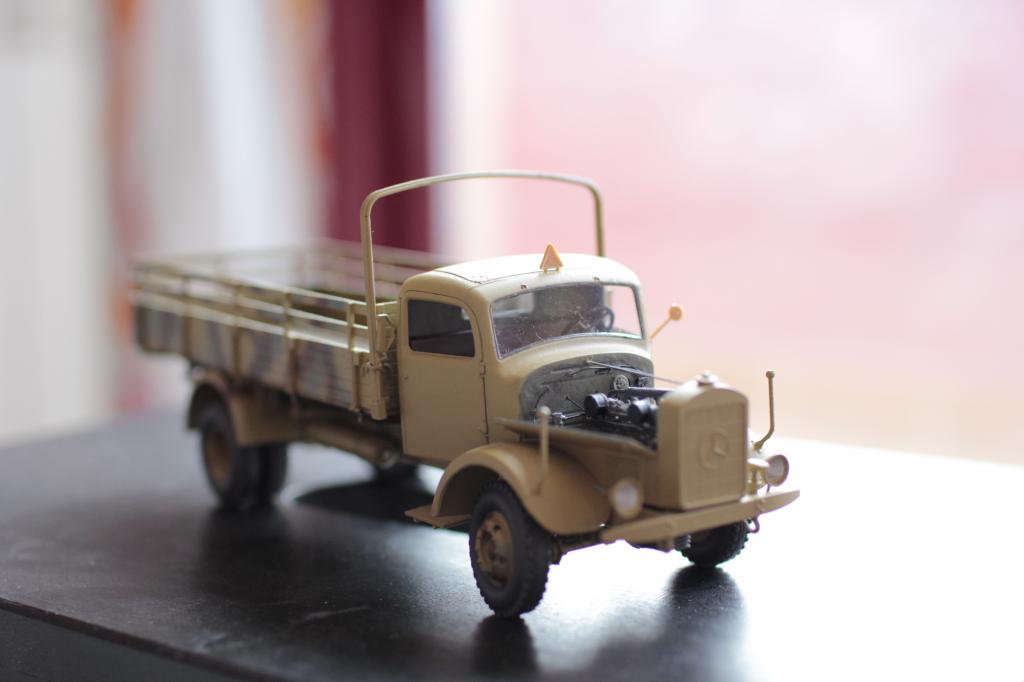
The cabin has been glued and i have filled the seams with liquid putty.
La cabina está pegada y he llenado las costuras con masilla líquida.
Αφού κολλήθηκε η καμπίνα περάστηκε με υγρό στόκο. Εν συνεχεία θα καλυφθούν τα διάφανα μέρη για να βαφεί!
The painting has finished. I will pass the camo now!
He acabado con la pintura base. Voy a pasar el camo ahora.
Ολοκληρώθηκε η βαφή της καμπίνας! Σήμερα συνεχίζω με την παραλλαγή και λογικά από αύριο φθορές!!!!
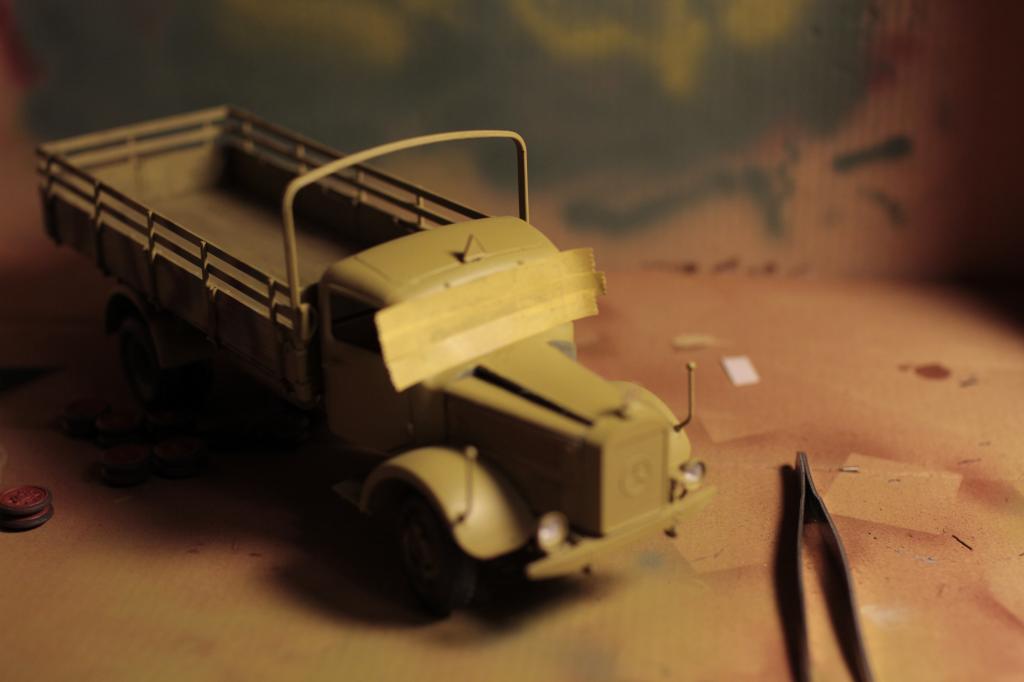
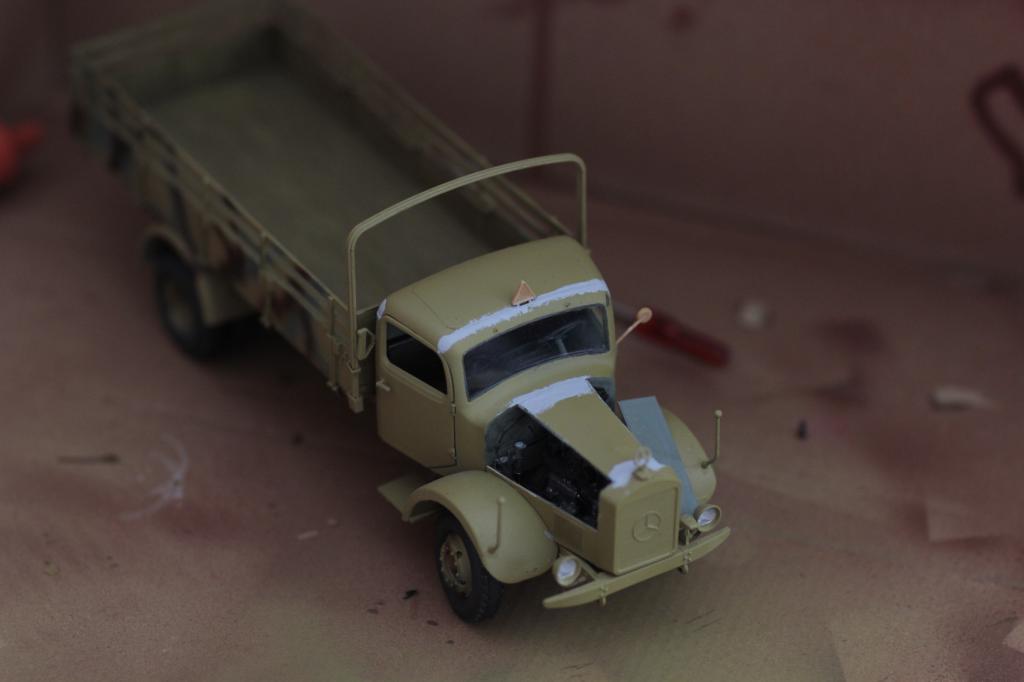
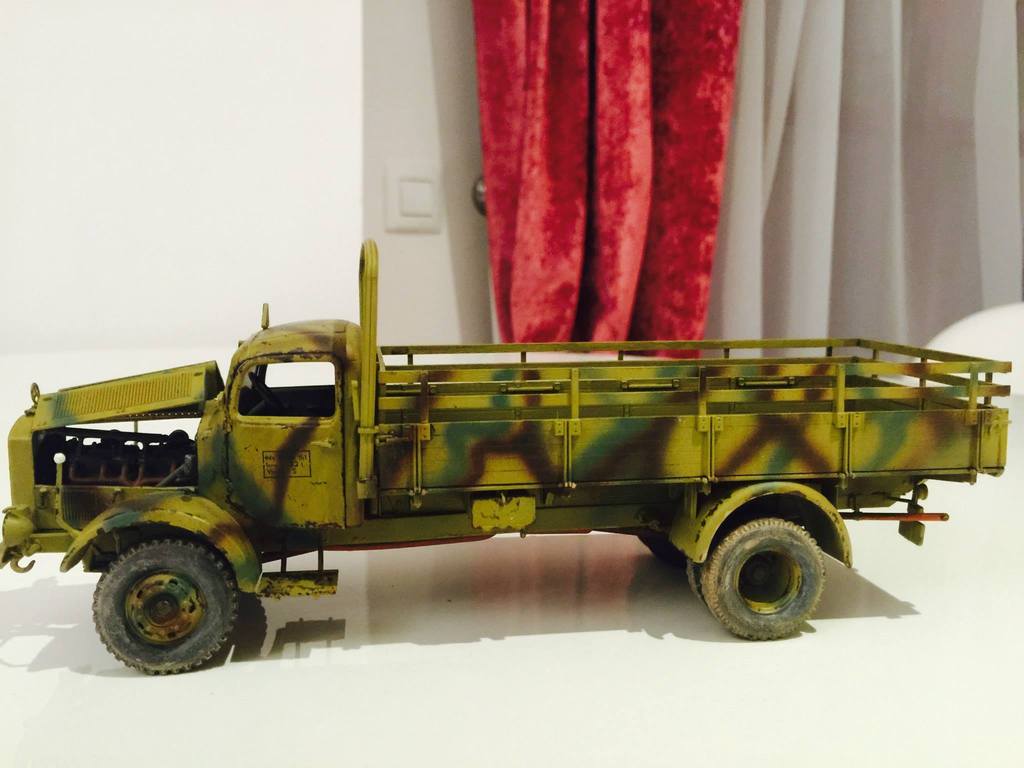
Camo done. Tires were sprayed with thinned Dust Colour of AMMO.
Camo hecho. Los neumaticos han sido envejecidos con diluido Dust Colour de AMMO.
Τελείωσε και βαφή της καμπίνας και των καλυμμάτων του κινητήρα! Θα συνεχίσω με φθορές, φίλτρα κτλ. Τα ελαστικά “σκονίστηκαν” με αραιωμένο dust της ΑΜΜΟ.


Decals are in place! I have sprayed all the kit with a satin varnish and then i applied a filter for tritonal camo of Mig Productions. Streaking Grime of AK interactive and chipping with AK 0711.
Las calcas están en su lugar ! He pasado todo el kit con un barniz satinado y luego apliqué un filtro para camo tritonal de Mig Productions . Streaking Grime de AK interactive y chipping con AK 0711 .
Μπήκαν οι χαλκομανίες, περάστηκε με φίλτρο για τρίχρωμη παραλλαγή της Mig ολόκληρο, εν συνέχεια με το streaking grime της AK και έγινε τσίπινγκ με το ΑΚ0711. Έγιναν και πλυσίματα! Αύριο θα συνεχίσω με τις φθορές για να καλυτερεύσω – προσθέσω όπου χρειάζεται!
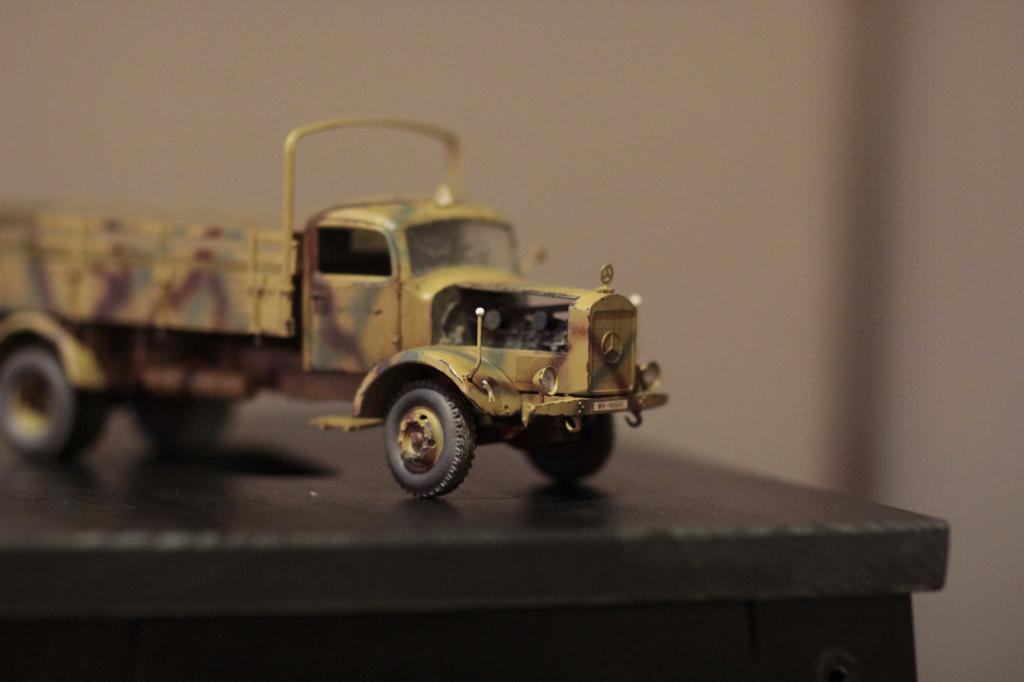

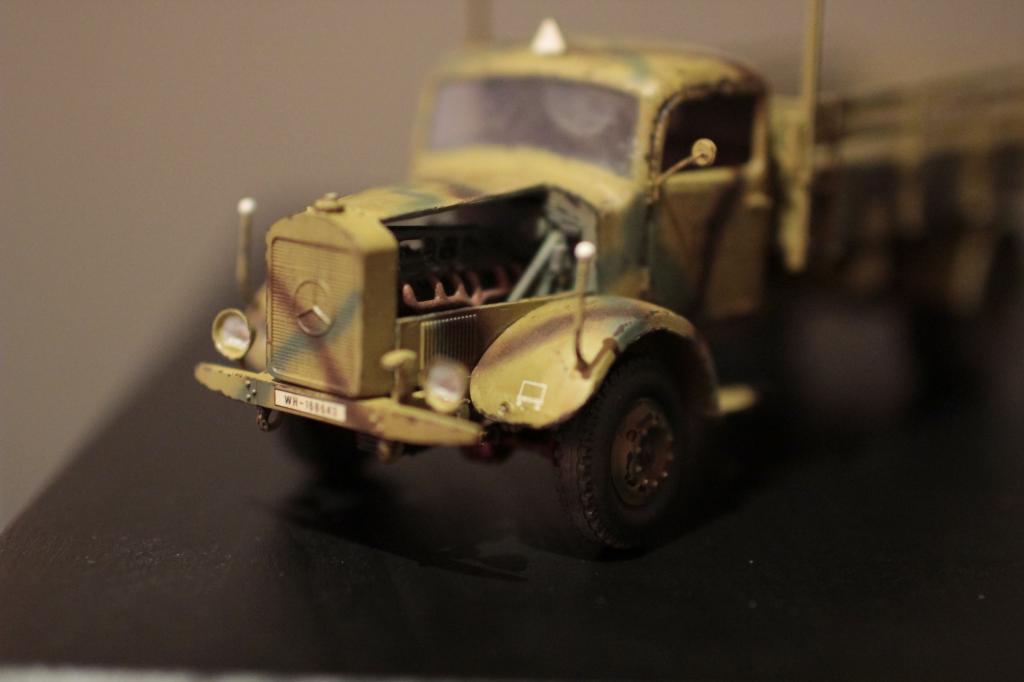

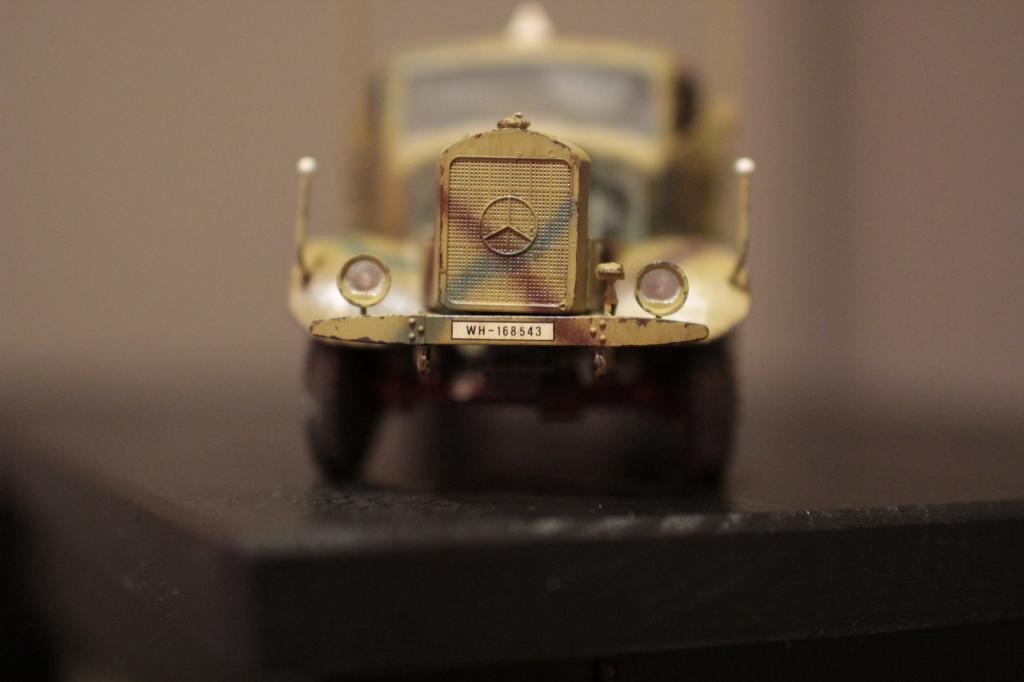
I have placed some rust in 2-3 spots and i made a wash to the wheels with Dust Effects of AK Interactive and pigments of AK and AMMO. I used Mig Productions Oil and Grease in some parts.
He puesto algo de oxido en 2-3 puntos y me hizo un lavado de las ruedas con efectos del polvo de AK Interactive y pigmentos de AK Interactive . He puesto aceites y grasas de Mig Productions en algunas partes .
Συνέχεια με φθορές στο φορτηγό! Περάστηκαν πάρα πολύ λίγες σκουριές σε 2 – 3 σημεία και περάστηκαν οι ρόδες ένα πλύσιμο με το Dust Effects της ΑΚ και εν συνεχεία με σκόνες ΑΚ και ΑΜΜΟ. Περάστηκαν ορισμένα σημεία με το Oil and grease της Μιg.

Incredibly well done !
LikeLiked by 1 person